
Side Dishes
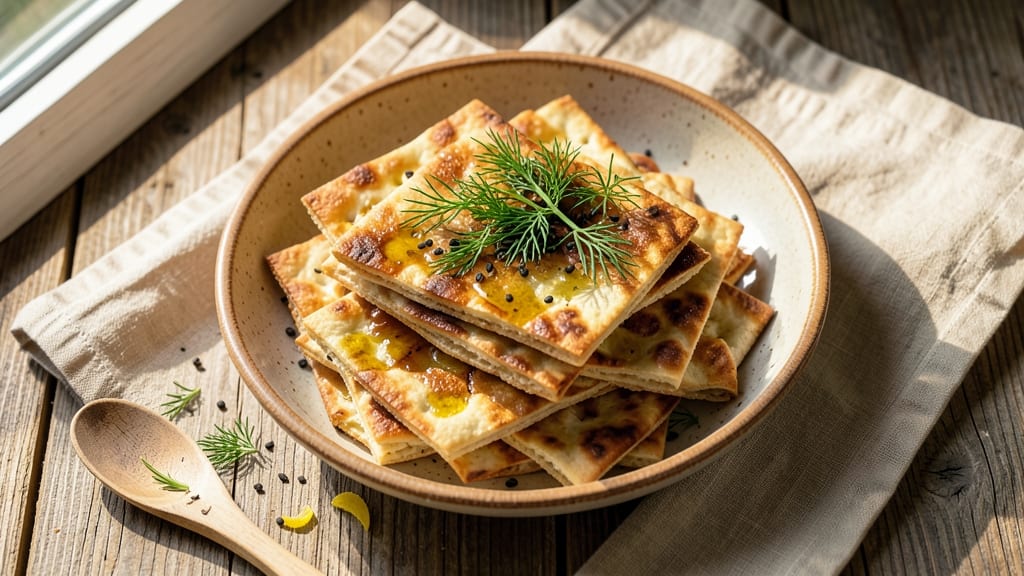
The crispy, layered magic of Armenian cracker bread—known as lavash—transforms simple ingredients into something extraordinary. This recipe delivers the perfect balance of crispy edges and tender centers, a staple in Armenian cuisine that's equally at home as a snack, wrap, or side dish.
The secret lies in a simple dough that's rolled paper-thin and baked to golden perfection, creating flatbreads so delicate they practically melt in your mouth.
What sets Armenian cracker bread apart is its versatility—use it as a crispy vessel for soups, a wrap for kebabs, or even as a snack straight from the oven. The dough requires just four basic ingredients: all-purpose flour, water, yeast, and salt, making it accessible for any home cook.
Rolling the dough to an almost translucent thinness is the key to achieving that signature crispy texture without compromising tenderness.
By the time you're done, you'll have stacks of golden-brown lavash that stay crisp for days when stored properly. The aroma alone will transport you to the streets of Yerevan, where these flatbreads are a daily staple.
Whether you're serving it at a family gathering or enjoying a quiet meal, this recipe delivers restaurant-quality results with minimal effort.
For added flavor, consider infusing the dough with herbs or using whole wheat flour for a nutty twist. The possibilities are endless, but the foundation remains the same—simple, crispy, and utterly satisfying. Let's get started on creating your own batch of Armenian cracker bread.
Ingredients for armenian cracker bread
Four core ingredients plus optional herbs—this is your ticket to crispy Armenian cracker bread.
| Ingredient | Amount | Notes |
|---|---|---|
| All-Purpose Flour 🌾 | 4 cups | Plus extra for dusting |
| Active Dry Yeast 🍞 | ¼ tsp | Or 1 packet instant yeast |
| Warm Water 💧 | 1 ¼ cups | Around 110°F (43°C) |
| Kosher Salt 🧂 | 1 tsp | Diamond Crystal preferred |
| Extra-Virgin Olive Oil 🫒 | 1 tbsp | Plus extra for brushing |
| Fresh Dill 🌿 | 2 tbsp | Chopped, optional for herbed flavor |
| Fresh Parsley 🌿 | 2 tbsp | Chopped, optional for herbed flavor |
| Garlic Cloves 🧄 | 2 cloves | Minced, optional for herbed flavor |
The flour is non-negotiable here—King Arthur or Gold Medal work best for that tender-yet-crispy texture. Yeast can be tricky, so check the expiration date—old yeast won't activate. Warm water is key: too hot kills the yeast, too cold makes it sluggish. I grab mine from the hot water tap and let it sit for 5 minutes. For the herbed version, fresh dill and parsley from the grocery store's produce section add that authentic Armenian touch—just chop them fine. Skip the herbs if you prefer classic lavash.
No instant yeast? Active dry yeast works too—just dissolve it in the warm water first. Short on herbs? Dried dill at half the amount gets you close. The olive oil can be swapped for vegetable or sunflower oil if you're out of EVOO. For the dough, whole wheat flour at half the amount adds nutty depth—mix it with the all-purpose for a hybrid texture. If you're rolling the dough and it cracks, dust with extra flour and gently press it back together. No food processor? Mix by hand with a fork—it just takes longer.
Freshly made lavash stays crisp for 3-4 days in an airtight container. For longer storage, wrap in parchment paper and freeze between sheets—thaw at room temperature for 10 minutes before using. Reheat in a 350°F oven for 5 minutes to revive crispiness. Pro tip: stack them like pages in a book to save space. The herbed version keeps its flavor for 2 days in the fridge, but the aroma fades faster—make it fresh for maximum impact.
Why You'll Love This Recipe
- Five-Ingredient Magic: I swear by this recipe because it’s that simple—just flour, yeast, water, salt, and olive oil. No fancy mix-ins, no stress. The dough comes together in minutes, and honestly? That’s all you need for bread this good.
- Crispy-Creamy Payoff: The olive oil gives it this irresistible richness, while the yeast keeps it light and airy. That first bite? Crisp edges, soft center—it’s the kind of bread that disappears faster than I can say “second slice.”
- Meal Prep MVP: Make a big batch on Sunday, and you’ve got snackable bread for the week. Tear it up for dips, toast it for breakfast, or pack it for lunch. It’s my go-to for lazy days when I don’t want to think.
- Budget-Friendly Staple: Flour, yeast, and olive oil won’t break the bank, and a single batch stretches forever. Between us, this is the kind of bread that makes grocery bills feel a little lighter—without sacrificing taste.
Step-by-step instructions for Armenian cracker bread
Here's how to make these crispy, layered flatbreads with herbed magic—simple steps for perfect results.
Activate the Yeast and Mix the Dough
In a large bowl, combine the 1.25 cups warm water (around 110°F) with the 0.25 tsp active dry yeast. Let it sit for 5-10 minutes until it becomes foamy—this means your yeast is alive and ready to work. If it doesn't foam, your yeast might be dead, and you'll need to start over.
Once foamy, add the 4 cups all-purpose flour and 1 tsp kosher salt to the bowl. Mix with a wooden spoon until a shaggy dough forms. Then, drizzle in the 1 tbsp extra-virgin olive oil and mix again. The dough will feel sticky, but that's normal—this is a wet dough that needs time to develop.
Knead Until Smooth and Elastic
Turn the dough onto a lightly floured surface and knead for 8-10 minutes until it's smooth and elastic. You'll know it's ready when it springs back slightly when poked. If the dough feels too sticky, wet your hands slightly to prevent sticking. Once kneaded, place the dough in a lightly oiled bowl, cover it with a damp towel, and let it rise in a warm place for 1-2 hours.
During this time, the dough should double in size. This rising step is crucial—it develops the gluten and gives the bread its signature crispy layers. If your kitchen isn't warm enough, place the bowl near a slightly warm oven (turned off) to help it rise faster.
Divide, Roll, and Layer the Dough
Once the dough has risen, punch it down to release the air and divide it into 4 equal portions. Roll each portion into a thin rectangle, about 1/8-inch thick. This is where the magic happens—you'll stack the dough layers with herbed butter for that signature flavor and texture.
In a small bowl, mix the 2 tbsp chopped fresh dill, 2 tbsp chopped fresh parsley, and 2 minced garlic cloves with 1 tbsp extra-virgin olive oil to make the herbed butter. Spread a thin layer of this mixture on one of the rolled dough rectangles, then stack the remaining dough rectangles on top. Seal the edges by pinching them together gently.
Roll Out and Cut into Squares
Roll the stacked dough out into a large rectangle, about 1/4-inch thick. Use a sharp knife or pizza cutter to cut the dough into 4 equal squares. The goal is to create thin, crispy layers, so don't press too hard while cutting—just guide the knife through gently.
Place the squares on a parchment-lined baking sheet, leaving a little space between them. Brush the tops lightly with a little extra olive oil to ensure they crisp up beautifully. Cover the baking sheet with a damp towel and let the dough rest for 20-30 minutes while you preheat the oven to 375°F.
Bake Until Golden and Crispy
Bake the cracker bread squares in the preheated oven for 15-20 minutes, flipping them halfway through the baking time. You'll know they're done when they're deep golden brown and crispy to the touch. The edges should be slightly puffed, and the layers should separate easily when you lift one.
Let them cool on the baking sheet for 5 minutes before transferring to a wire rack. Serve warm for the best texture—these crackers are crispy when hot but become softer as they cool. Store any leftovers in an airtight container for up to 3 days, but they're best enjoyed fresh!
Pro Tips For Making Armenian Cracker Bread
- Bloom the Yeast First: Skip mixing yeast straight into flour—it’s a rookie move. Instead, dissolve it in the warm water (about 110°F) with a pinch of sugar (if your recipe lacks it) and let it foam for 5–10 minutes. If it’s sluggish after 10, your yeast is dead, and you’ll waste dough. Trust me, this small step saves headaches later.
- Oil the Pan Thin: Armenian cracker bread needs that crispy, golden bottom, but too much oil makes it greasy. Use a paper towel to wipe off excess after brushing—just a light coat, like a whisper of olive oil. I learned this after burning two batches with sticky, soggy bottoms.
- Shape Dough Like a Pro: Roll the dough into a tight, even rectangle—no thicker than ¼ inch—and fold the edges inward like a book. This keeps the crackers flat and crispy, not puffy or uneven. My first attempts looked like lumpy pancakes, but this method guarantees clean breaks.
- Bake in Batches: Overcrowding the pan steams the crackers, turning them soft instead of crisp. Bake in single layers with space between them—even if it means two rounds. I know, it’s tempting to rush, but patience here makes all the difference in texture.
Wine and beer pairings for these flavors
White Wine Pairings
Armenian cracker bread shines with crisp, dry white wines that cut through its crispy layers. A Sauvignon Blanc from Georgia or New Zealand—like Cloudy Bay—brings bright citrus and herbal notes that complement the herbed lavash.
The acidity refreshes your palate between bites, making it perfect for snacking. I always reach for a chilled bottle when serving these crackers as appetizers. 🍷
Rosé for Balance
For a lighter touch, try a Provence-style rosé with its delicate strawberry and floral notes. The subtle sweetness in Whispering Angel pairs beautifully with the herbed butter flavor, while still letting the cracker bread's crispy texture shine.
Serve it slightly chilled for the best experience. This is my go-to when hosting dinner parties.
Beer Pairings
A crisp Belgian Witbier like Hoegaarden adds a refreshing contrast with its coriander and orange peel notes. The effervescence cleanses your palate between bites of lavash. For a bolder option, try a German Pilsner—its malty backbone stands up to the herbed flavor while maintaining balance.
I love pairing these crackers with a cold beer during casual gatherings. 🍺
Red Wine Options
If you prefer red, opt for a light-bodied Pinot Noir from Willamette Valley. Its red fruit flavors and silky texture won't overpower the delicate cracker bread. Avoid heavy Cabernets or Syrahs that could dominate the dish.
A slightly chilled glass enhances the experience, especially with herbed lavash. This pairing works beautifully for more formal occasions.
Non-Alcoholic Choices
For non-drinkers, a sparkling ginger beer like Feather's adds zing with its spicy kick. Alternatively, a cucumber-mint infused water with sliced lemon keeps things refreshing. The effervescence and cool temperature make these crackers even more satisfying. I always have this option ready when hosting diverse groups. 💧
Cultural Context
In Armenia, lavash is often enjoyed with ayran (yogurt drink) or dovga (fermented milk drink) during traditional meals. These beverages complement the bread's crispy texture while adding a creamy contrast.
For a modern twist, try pairing with sparkling water with lime—it's a refreshing alternative that keeps the cultural spirit alive. 🌿
Nutrition facts
Frequently asked questions
Why does Armenian cracker bread need to rest before baking?
The 20-30 minute rest before baking is crucial for even cooking and crispiness. This allows the dough to relax, preventing cracks when rolled thin. It also helps the layers separate cleanly during baking—skipping this step can result in uneven thickness or gummy centers. Think of it as giving the dough a final "breath" before the oven transforms it into crispy magic!
Can I make Armenian cracker bread without herbs?
The classic version uses just flour, water, yeast, salt, and oil. Simply omit the fresh dill, parsley, and garlic from the herbed butter mixture. The plain version still delivers that signature crispy texture—it's just missing the aromatic depth. This works perfectly for serving with soups or dips where you want the bread to be neutral.
What's the secret to getting the dough paper-thin?
Start with a well-kneaded dough that's 1/8-inch thick before stacking, then roll the final rectangle 1/4-inch thick—this creates the illusion of thinness while preventing tears. Use a rolling pin with even pressure and keep the dough dusted with flour. If it resists, let it rest 5 more minutes. The key is patience: thin layers bake faster and stay crisp longer.
How do I store Armenian cracker bread to keep it crispy?
Store in an airtight container between layers of parchment paper to prevent sticking. For maximum crispness, place a silica gel packet in the container to absorb moisture. Reheat in a 350°F oven for 5 minutes to revive crispiness. Freezing works too—wrap individually in parchment and freeze for up to 3 months. Thaw at room temperature before serving.
What's the best way to serve Armenian cracker bread?
Use it as a crispy vessel for soups, wraps for kebabs, or as a snack with hummus and olive oil. The herbed version pairs beautifully with fresh salads or grilled meats, while plain crackers work well with cheese platters. In Armenia, it's often served with ayran (yogurt drink) or dovga for dipping. The possibilities are endless—let your creativity guide you!