
Snacks
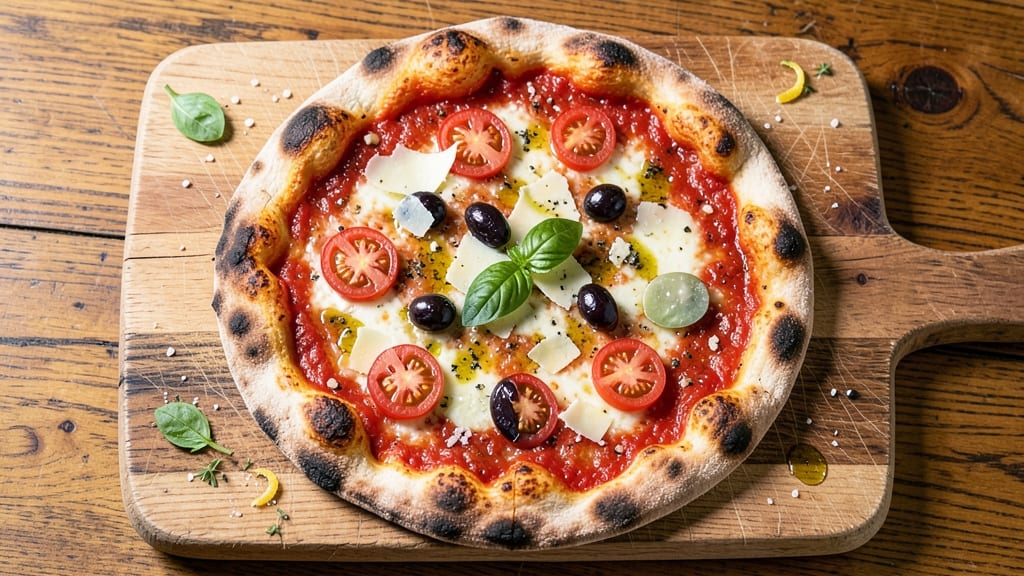
This artisan flatbread pizza recipe delivers the perfect balance of charred edges and a stretchy, chewy crust that rivals your favorite pizzeria. The secret lies in a simple yet precise dough technique that develops flavor as it rests, creating that signature wood-fired texture right in your home kitchen.
I've perfected this method over years of testing, and it never fails to impress—whether you're feeding a crowd or treating yourself to a solo dinner.
The foundation starts with a basic dough that transforms through proper fermentation and stretching techniques. No fancy equipment needed—just your hands, a little patience, and a hot pan or pizza stone to achieve that coveted crispy-yet-soft crust.
The dough's elasticity comes from proper kneading and resting, while the charred edges develop from high-heat cooking. This approach works equally well for classic Margherita or bold pepperoni toppings.
What you'll end up with is a pizza that's crispy at the edges, chewy in the middle, and perfectly golden underneath—each bite offering a symphony of textures and flavors. The crust holds up to generous toppings without becoming soggy, and the sauce stays vibrant without overpowering the dough.
This recipe isn't just about the crust; it's about creating a complete dish where every element works in harmony.
For those who want to experiment, try adding fresh basil to a classic tomato sauce or sprinkling flaky sea salt on top before baking. The possibilities are endless, but the foundation remains the same: a perfectly balanced dough that becomes the star of the show.
Let's get started on creating your own artisan flatbread masterpiece.
Ingredients for artisan flatbread pizza
Simple dough, bold flavors—this is your flatbread pizza foundation.
| Ingredient | Amount | Notes |
|---|---|---|
| All-Purpose Flour 🌾 | 3 cups | Plus 1 tbsp for dusting |
| Active Dry Yeast 🍞 | ¼ tsp | Or 1 packet instant yeast |
| Warm Water 💧 | 1 cup | 110°F for activating yeast |
| Extra-Virgin Olive Oil 🫒 | 1 tbsp | Plus extra for stretching |
| Fine Sea Salt 🧂 | 1 tsp | Diamond Crystal preferred |
| Sugar 🍬 | 1 tsp | Helps yeast activate faster |
| San Marzano Tomato Sauce 🍅 | ½ cup | Crushed by hand preferred |
| Fresh Mozzarella Cheese 🧀 | 1 cup | Shredded or torn pieces |
| Fresh Basil Leaves 🌿 | ¼ cup | Chopped for garnish |
| Garlic Cloves 🧄 | 2 cloves | Minced for sauce |
| Pepperoni Slices 🍕 | 4 oz | Or your favorite toppings |
| Flaky Sea Salt 🧂 | 1 tbsp | For finishing before baking |
The flour is everything here. King Arthur or Caputo Tipo 00 if you want to splurge, but regular all-purpose works in a pinch—just don't over-knead. Yeast is your secret weapon for that chewy texture, so make sure it's fresh (test by dropping a pinch in warm water—it should bubble in 5 minutes). The warm water needs to be 110°F—not boiling, not cold. I grab mine from the tap, let it sit for 5 minutes, then check with a thermometer. The olive oil adds richness and helps with stretching, so don't skimp. For the sauce, San Marzano tomatoes are worth the splurge—they're sweeter and less acidic, so your crust won't get overwhelmed.
No fresh mozzarella? Low-moisture shredded works too, but squeeze out excess moisture first. Pepperoni hater? Swap for sliced mushrooms, caramelized onions, or even just extra sauce. The basil can be dried if you're in a bind (use half the amount), but fresh is ideal—toss some whole leaves on top before baking for that classic pizza look. Running low on garlic? Garlic powder at half the amount gets you close. For the dough, if you forget to add yeast, just add it to the water and wait 10 extra minutes—no big deal. The sugar isn't just for sweetness; it helps the yeast activate faster, so don't skip it.
Dough keeps 2 days in the fridge wrapped tightly in plastic, or 3 months frozen. Let it thaw overnight in the fridge before using. The sauce can be made 3 days ahead—it actually tastes better after flavors meld. Store it in a sealed jar in the fridge. For the cheese, fresh mozzarella lasts 5 days wrapped in paper towels, while shredded keeps 1 week in the fridge. Prep everything the night before so you're just stretching and baking the next day—trust me, it's worth the extra minute.
Why You'll Love This Recipe
- No-Knead Magic: I swear by this dough—just flour, yeast, water, and olive oil. No standing at the counter, no overworking the gluten. The yeast does all the heavy lifting while I sip my coffee.
- Crispy-Chewy Perfection: That golden edge with a pillowy center? The olive oil keeps it tender while the high heat from your broiler or skillet creates the kind of crisp I’d pay $15 for at a pizzeria. (Between us, it’s better.)
- Weeknight Superstar: Dinner with the kids? Date night? Last-minute guests? This flatbread comes together faster than takeout, and I’ve topped it with everything from margherita basics to leftover roasted veggies. No rules—just flexibility.
- Pantry Goldmine: Five ingredients, zero waste. The dough keeps for days in the fridge, and the leftovers? Toss them in a pan the next morning for flatbread toast with jam or a quick frittata. Budget-friendly doesn’t get more reliable than this.
Step-by-step instructions for artisan flatbread pizza
Here's how to craft that perfect charred-edged, chewy-crusted flatbread pizza at home.
Activate the Yeast and Mix the Dough
In a large bowl, combine the 1 cup warm water (about 110°F), 1 tsp sugar, and 0.25 tsp active dry yeast. Let it sit for 5-10 minutes until frothy—this confirms your yeast is alive and ready to work. If it doesn't bubble, start over with fresh yeast.
Add the 3 cups all-purpose flour and 1 tsp fine sea salt to the bowl. Stir with a wooden spoon until a shaggy dough forms. Then, drizzle in 1 tbsp extra-virgin olive oil and mix until the dough comes together. It'll be sticky, but that's perfect for our flatbread texture.
Knead and Rest the Dough
Turn the dough onto a lightly floured surface and knead for 5-7 minutes until smooth and elastic. You're looking for a dough that springs back when poked but doesn't stick to your fingers. If it's too sticky, wet your hands slightly—don't add more flour or it'll toughen the crust.
Place the dough in a lightly oiled bowl, cover with a damp towel, and let it rise at room temperature for 1-2 hours (or until doubled in size). The dough should feel light and airy when pressed gently. This resting period develops flavor and creates that signature chewy texture we're after.
Prepare the Tomato-Garlic Sauce
While the dough rises, make the sauce by crushing the 0.5 cup San Marzano tomato sauce with your hands or a fork. Add the 2 minced garlic cloves and simmer gently in a small saucepan for 5 minutes until fragrant. Season lightly with salt and pepper—this sauce should complement, not overpower, your toppings.
Keep this sauce warm until you're ready to assemble. The residual heat will help meld the flavors once everything comes together. If it thickens too much, add a splash of water to maintain a smooth, spreadable consistency.
Shape and Assemble the Flatbread
Preheat your oven to 475°F with a pizza stone or baking sheet inside. Divide the risen dough into 4 equal portions (about 8 oz each) and roll each into a 12-inch round using your hands or a rolling pin. The edges should be slightly thicker than the center—this creates that perfect charred border we love.
Transfer each flatbread to a piece of parchment paper. Spread 2 tbsp of the tomato-garlic sauce evenly over each, leaving a ½-inch border for the crust. Sprinkle with ¼ cup shredded fresh mozzarella cheese and arrange 1 oz pepperoni slices on each. Finish with a pinch of flaky sea salt—this enhances the cheese and adds that gourmet touch.
Bake to Charred Perfection
Carefully transfer the assembled flatbreads (with parchment) onto the preheated pizza stone or baking sheet. Bake for 10-12 minutes until the crust is deep golden brown with charred edges and the cheese is bubbly and lightly browned. Rotate the pans halfway through for even baking.
Remove from the oven and let rest for 2 minutes before slicing. Top each pizza with 1 tbsp chopped fresh basil leaves and an extra sprinkle of flaky sea salt. Serve immediately while the crust is still warm and chewy—this is when it's at its absolute best.
Pro Tips For Making Artisan Flatbread Pizza
- STRETCH THE DOUGH LONG: I learned this the hard way—skipping the 10-minute stretch on the counter makes the dough tougher and less tender. Grab two edges, pull toward you with both hands, then gently fold over itself and press down. Repeat until it’s silky and springy (yes, even if you’re impatient like me).
- USE OLIVE OIL LIKE GOLD: This isn’t the prettiest method, but it’s the tastiest: brush the dough with extra-virgin olive oil after shaping, then let it sit uncovered for 10 minutes. The crust will be crispier and more flavorful—no need for extra oil later.
- SALT THE WATER HARD: I was skeptical until I tried it: dissolve the fine sea salt directly into the warm water with the yeast. It speeds up activation and ensures even distribution—no clumpy dough or aftertaste. (Your future self will thank you.)
- PREHEAT THE PAN OR STONE: Does it look weird? Yes. Does it work? Every single time. Heat a cast-iron skillet or pizza stone in the oven for 15 minutes at max temp before baking. The dough will cook through faster and get that perfect char without burning.
Regional styles of this dish
Neapolitan Style
For that authentic Italian experience, use Caputo Tipo 00 flour and stretch your dough to 14 inches with slightly thinner edges. Cook on a preheated pizza steel at 750°F for 60-90 seconds—yes, that's right, your home oven can mimic wood-fired results!
Top with San Marzano tomato sauce, fior di latte mozzarella, fresh basil, and a drizzle of extra-virgin olive oil. The high heat creates those signature charred spots while keeping the center soft and pillowy. 🔥
Roman-Style Pizza
Roman pizza is all about the thickness and crispy edges. Roll your dough into a 12-inch round with a thick center (about ½ inch thick) and thin edges. Bake on a pizza stone at 500°F for 12-15 minutes until the crust is golden and crisp.
Top with a garlic-infused olive oil base instead of tomato sauce, then add ricotta cheese, Pecorino Romano, and your choice of toppings like prosciutto or artichokes. The result is a hearty, crispy-edged pizza that's perfect for sharing.
California-Style Flatbread
This West Coast twist swaps traditional toppings for bold flavors. Start with a thin, crispy crust (roll your dough to 13 inches) and bake at 500°F for 10 minutes.
Top with a base of pesto, then layer with goat cheese, roasted red peppers, sun-dried tomatoes, and balsamic glaze. Finish with arugula and a sprinkle of crumbled feta after baking. The tangy, herby flavors make this a crowd-pleaser for any gathering. 🌿
Indian Naan-Inspired Flatbread
For a fusion twist, replace yeast with 1 tsp instant yeast plus 1 tsp sugar and add 1 tbsp yogurt to the dough. Roll into a 10-inch round and bake on a cast-iron skillet over medium-high heat for 2-3 minutes per side until puffed and charred.
Top with garlic butter, tandoori chicken, red onions, and a drizzle of mint chutney. The result is a smoky, chewy flatbread with bold Indian flavors—perfect for a spice-loving crowd! 🌶️
Gluten-Free Adaptation
Swap the all-purpose flour for a 1:1 gluten-free flour blend (like Bob's Red Mill) and add 1 extra tbsp xanthan gum to improve elasticity. Let the dough rest for 30 extra minutes to hydrate properly.
Roll to 11 inches and bake at 450°F for 14-16 minutes on a preheated pizza stone. Top with gluten-free mozzarella, tomato sauce, and fresh basil—the texture won't be identical, but it's still delicious and inclusive for everyone at the table. ✨
Nutrition facts
Frequently asked questions
Can I make this flatbread pizza without a pizza stone?
Use a heavy baking sheet or even a cast-iron skillet for that crispy crust. Preheat it in the oven for 20 minutes before transferring your pizza. For extra crispiness, place the assembled flatbread directly on the hot skillet and cover with a lid for the first 3 minutes of baking. The trapped steam helps create that signature charred edge.
Why did my crust turn out dense instead of chewy?
Dense crusts usually happen from over-kneading or under-rising. Knead just until the dough springs back when poked (5-7 minutes max), and let it rise until doubled in size. If your kitchen is cold, extend the rise time to 2-3 hours. Also, check your yeast—it should bubble within 5 minutes when mixed with warm water.
How do I prevent soggy toppings?
Layer toppings strategically: cheese first (it melts and creates a barrier), then saucy ingredients like tomatoes or pepperoni. Keep sauce minimal (2 tbsp per pizza) and pat toppings dry before adding. For extra insurance, bake your flatbread for 2 minutes uncovered before adding toppings to set the crust slightly.
Can I make this dough ahead of time?
Yes! The dough keeps for 2 days in the fridge wrapped tightly in plastic, or 3 months frozen. Thaw overnight in the fridge before using. Pro tip: Let it sit at room temperature for 30 minutes after thawing to make stretching easier. The flavor actually improves with time as the dough develops more complexity.
What's the best way to stretch the dough without tearing?
Use your fingertips to gently press and stretch from the center outward, rotating the dough as you go. Keep the surface lightly floured but don't over-dust—too much flour makes the dough tough. If it resists, let it rest for 10 minutes before trying again. For thick edges, roll the dough between your palms to create a slightly thicker border before stretching.