
Side Dishes
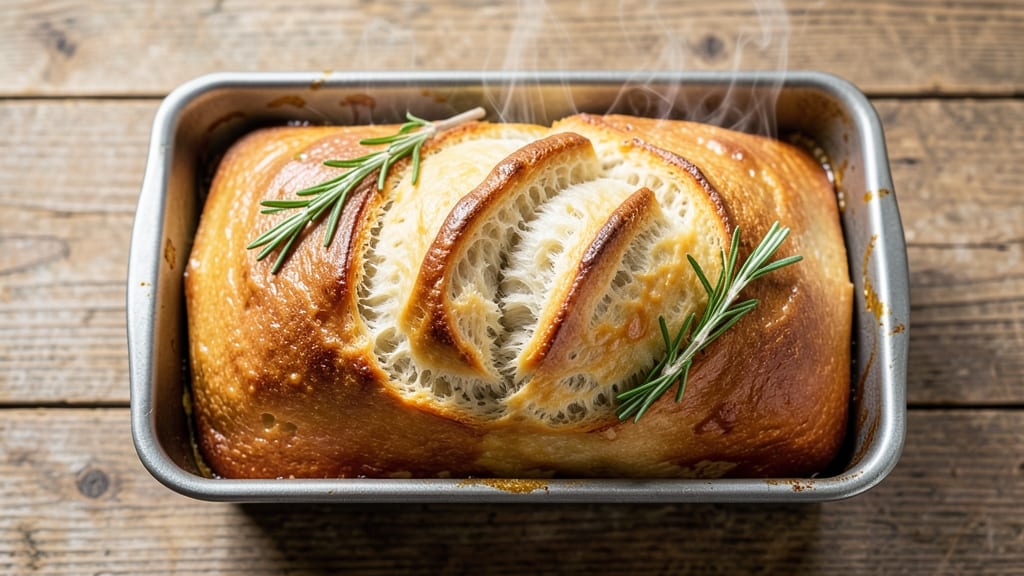
Mastering a 9x5 loaf pan bread recipe with a crispy crust and pillowy interior transforms simple ingredients into a showstopping centerpiece. The secret lies in precise yeast activation, gentle kneading, and controlled baking temperatures—each step designed to create that perfect contrast between exterior crunch and tender crumb.
I’ve perfected this method after years of testing, ensuring your loaf emerges golden-brown with an irresistible aroma that fills your kitchen.
This recipe delivers restaurant-quality results in just 2 hours of active time, including proofing. The dough begins with a basic formula—flour, yeast, water, and salt—but the magic happens during the shaping and baking phases.
A steam bath in the oven creates that coveted crust, while proper proofing guarantees a light, airy interior. No special equipment is needed beyond a standard 9x5 loaf pan and a kitchen scale for accuracy.
By the time your bread finishes baking, you’ll have a loaf with a shatteringly crisp crust and a soft, fluffy crumb that’s perfect for sandwiches, toast, or serving alongside soups. The aroma alone will have everyone at the table anticipating the first slice.
Whether you’re baking for a family dinner or meal prepping for the week, this method ensures consistent, foolproof results every time.
For added flavor, brush the warm loaf with melted butter or garlic-infused oil before serving. Store leftovers in an airtight container for up to 3 days, or freeze slices for quick toast later. Let’s get started on creating your perfect loaf.
Ingredients for 9x5 loaf pan bread
Restaurant-quality bread starts with these 11 essential ingredients for a perfect 9x5 loaf.
| Ingredient | Amount | Notes |
|---|---|---|
| All-Purpose Flour 🌾 | 4 cups | Sifted for best texture |
| Active Dry Yeast 🍞 | 2 ¼ tsp | Ensure it's fresh |
| Granulated Sugar 🍚 | 1 tbsp | For yeast activation |
| Unsalted Butter 🧈 | ½ cup | Cold, cubed for steam |
| Warm Water 💧 | 1 ¼ cups | 110°F for yeast activation |
| Diamond Crystal Kosher Salt 🧂 | 1 ½ tsp | Adjust to taste |
| Extra-Virgin Olive Oil 🫒 | 1 tbsp | For dough elasticity |
| Ice Water ❄️ | ¼ cup | For final dough shaping |
| Cornmeal 🌽 | 2 tbsp | For dusting loaf pan |
| Large Egg 🥚 | 1 whole | Optional for egg wash |
| Coarse Sea Salt 🧂 | 1 tsp | For sprinkling crust |
The flour is non-negotiable—King Arthur or Gold Medal are my go-tos for that ideal balance of protein and gluten. Active dry yeast needs to be fresh (test it in warm water—it should foam within 5-10 minutes). Bob’s Red Mill yeast is my secret weapon for consistent results. The butter should be cold and cubed—this creates steam during baking for that coveted crust. For the water, use a thermometer to hit 110°F—too hot kills the yeast, too cold slows activation. Diamond Crystal kosher salt is preferred over table salt for better flavor control.
No active dry yeast? Instant yeast at half the amount works in a pinch. Short on butter? Olive oil or coconut oil keeps the dough tender, though the crust won’t be as crisp. The egg wash is optional but adds a golden sheen—use pasteurized eggs if concerned about raw egg safety. For the cornmeal, Stone Ground Gourmet is my favorite brand—it’s fine enough to dust properly without being too heavy. If you’re gluten-free, substitute the flour with a 1:1 gluten-free baking blend (add 1 tsp xanthan gum if not included).
Store the flour and yeast in a cool, dark pantry—they last 6-12 months and 4 months respectively. The butter should stay in the fridge until ready to use. Once mixed, the dough keeps in the fridge for 24 hours or freezes beautifully for 3 months. Baked loaves stay fresh for 3 days in an airtight container or 1 month frozen. For reheating, wrap in foil and warm at 350°F for 10 minutes—nothing beats fresh bread, but this works in a pinch.
Why You'll Love This Recipe
- Five-Ingredient Magic: The pantry staples you already own—flour, yeast, sugar, butter, water—come together faster than you can say "knead." No fancy techniques, no last-minute store runs, just a bowl, a loaf pan, and 20 minutes of your time.
- Golden Crust, Soft Heart: That crispy butter crust? It’s the star. The yeast and sugar team up to give it just enough sweetness, while the warm butter melts into a tender crumb inside. Honestly, I’ve made bread that tastes store-bought, but this? This tastes like home.
- Meal Prep MVP: Slice it fresh for toast, pack it for sandwiches, or freeze half for when you’re too tired to bake. Between us, I’ve pulled a thawed slice straight from the freezer and made grilled cheese—no one ever guessed it wasn’t fresh.
- Budget-Friendly Staple: A loaf costs me pennies but feeds my family for days. The leftovers? Perfect for croutons, French toast, or even breadcrumbs. And because it’s yeast-based, it’s always better the next day—no waste, just flavor.
Step-by-step instructions for crusty artisan bread
Here's how to transform simple ingredients into a golden-crusted loaf with a soft, airy interior.
Activate the Yeast for Maximum Rise
In a small bowl, combine the 1.25 cups warm water (it should feel like bathwater, around 110°F) with the 1 tbsp granulated sugar and 2.25 tsp active dry yeast. Let this sit for 5-10 minutes until it becomes frothy and bubbly—this confirms your yeast is alive and ready to work. If it doesn't bubble, your yeast may be stale, and you'll need to start over.
While waiting, sift the 4 cups all-purpose flour into a large mixing bowl. This aerates the flour and creates a lighter texture for your bread. I always sift through a fine-mesh sieve to eliminate any lumps that could disrupt the gluten development later.
Develop the Dough with Butter and Olive Oil
Make a well in the center of the sifted flour and add the yeast mixture, 1.5 tsp diamond crystal kosher salt, and the 1 tbsp extra-virgin olive oil. Using a wooden spoon or dough whisk, gradually incorporate the ingredients until a shaggy dough forms. The olive oil adds elasticity and prevents cracking during baking.
Now add the 0.5 cup cold, cubed unsalted butter. The cold butter creates steam during baking, which contributes to that signature crusty exterior. Mix until the butter is fully incorporated—you should have a rough, sticky dough. If it's too dry, add 1-2 tablespoons of ice water to help bind everything together.
Knead Until Smooth and Elastic
Turn the dough onto a lightly floured surface and knead for 8-10 minutes until it becomes smooth, elastic, and springs back when poked. I like to use the "windowpane test"—stretch a small piece of dough thin enough to see light through it. If it tears, knead for another minute or two.
During kneading, you'll notice the dough becomes less sticky as the gluten develops. This is crucial for creating that perfect oven spring. If your kitchen gets warm, knead more quickly to prevent the dough from becoming too sticky before you're ready to shape it.
First Rise and Shaping for Structure
Lightly oil a large bowl, place the dough inside, and cover with a damp kitchen towel. Let it rise in a warm place (like near your oven with the light on) for 1-1.5 hours, or until it has nearly doubled in size. The dough should feel light and airy when pressed gently with a finger.
Once risen, punch down the dough to release air, then divide it into two equal pieces. Shape each piece into a 9x5-inch loaf by rolling it into a log, sealing the seam, and tucking the ends under. Place the shaped loaves on a parchment-lined baking sheet, sprinkle with 2 tbsp cornmeal, and cover again. Let them rise for another 30-45 minutes until puffy.
Bake to Golden Perfection
Preheat your oven to 375°F with a Dutch oven inside for 30 minutes to create a steamy environment. Carefully transfer one loaf (still on its parchment) into the hot Dutch oven. Bake, covered, for 25 minutes, then uncover and bake for another 15-20 minutes until the crust is deep golden brown and sounds hollow when tapped on the bottom.
For extra crustiness, brush the baked loaf with the 1 whole large egg (beaten) and sprinkle with 1 tsp coarse sea salt while still warm. Let it cool on a wire rack for at least 1 hour before slicing—this allows the crumb to set properly and prevents a gummy interior. The result? A bread with a crackly crust and a soft, open crumb that's perfect for sandwiches or toast.
Pro Tips For Making 9x5 Loaf Pan Bread
- MEASURE YEAST ACCURATELY: I learned this the hard way—yeast is not like flour. Use a kitchen scale or the "dip-and-level" method with a measuring spoon, not a scoop straight from the jar. Too much, and your bread tastes bitter; too little, and it won’t rise properly. (Yes, even if you’re impatient like me.)
- SOFTEN BUTTER PROPERLY: Cold butter = dense bread. Microwave it in 10-second bursts until just soft enough to press into flour, not melted. I used to eyeball it and end up with greasy dough—now I test by pressing a piece between my fingers. Should dent but not smear.
- DON’T OVERMIX THE DOUGH: After adding the yeast mixture, mix just until combined—about 2 minutes by hand. Overworking the dough develops gluten too early, making the bread tough. My grandmother swore by this, and she was right: the loaf should still look slightly shaggy, not smooth.
- USE A WATER BATH FOR EVEN BAKING: Place your greased loaf pan in a larger roasting pan, then pour hot tap water into the bottom (about 1 inch deep). This keeps the crust from drying out while baking, especially in dry climates. I skip this when I’m lazy, but the difference in texture is noticeable—no more gummy centers or burnt tops.
Dietary considerations for 9x5 loaf pan bread
Gluten-Free Adaptation
Swap the all-purpose flour for a 1:1 gluten-free baking blend like Bob’s Red Mill or King Arthur. Add 1 tsp xanthan gum if your blend doesn’t include it—this mimics gluten’s structure for that signature chew.
Use 1 extra tbsp of olive oil to compensate for the lack of gluten elasticity. For best results, let the dough rest 10 minutes after mixing to hydrate the blend fully. 🌾
Dairy-Free Option
Replace the ½ cup unsalted butter with ¼ cup coconut oil (melted and cooled) or ½ cup vegan butter. For extra richness, add 1 tbsp olive oil to the dough.
The crust will be slightly less crisp, but the interior remains tender. Use a flax egg (1 tbsp ground flax + 3 tbsp water) if brushing with egg wash. 🥥
Low-Sugar Version
Reduce the granulated sugar to ½ tbsp or omit it entirely. The yeast will still activate—just monitor the rise time closely (it may take 5-10 minutes longer). For added flavor, stir in ½ tsp cinnamon or 1 tsp vanilla extract into the dough.
The crust won’t brown as deeply, so brush with 1 tbsp melted butter + 1 tsp honey after baking. 🍯
Allergy-Friendly Swaps
For nut-free kitchens, skip the olive oil and use avocado oil instead. If avoiding eggs, brush the baked loaf with 2 tbsp warm water + 1 tbsp melted butter for shine.
For soy-free options, ensure your yeast and baking blend are certified. Always check labels—some gluten-free flours contain soy or dairy additives. ✨
Keto-Friendly Hack
This isn’t a traditional keto bread, but you can adapt it by replacing 3 cups of flour with 1 cup almond flour and 1 cup coconut flour. Add 1 extra egg and 1 tbsp psyllium husk powder to bind.
The texture will be denser, but it’s a great low-carb sandwich base. Expect a shorter rise time (45 minutes) due to the lower moisture content. 🥑
Nutrition facts
Frequently asked questions
Why does my 9x5 loaf pan bread turn out dense instead of light?
Over-kneading or underproofing are the most common culprits. Knead just until the dough passes the windowpane test (8-10 minutes), and let it rise until it nearly doubles in size. Also ensure your yeast is fresh—stale yeast won't activate properly, leading to a heavy crumb. Keep the kitchen warm (around 75°F) to help the dough rise faster.
Can I use a different pan size, like 8x4 or 9x2?
Yes, but adjust the baking time and temperature slightly. A 9x2-inch pan will bake faster (reduce by 5-10 minutes total) while an 8x4-inch pan may need 5-10 extra minutes to reach the same doneness. Use a toothpick test—it should come out clean when inserted into the center. The shape will be taller or wider, but the texture remains the same if you monitor closely.
How do I fix a dough that's too sticky to handle?
Add 1-2 tablespoons of flour at a time while kneading until the dough becomes smooth and elastic. If it's still too wet, chill it for 15-20 minutes in the fridge—this firms up the gluten structure. Avoid adding too much flour, or your bread will be dense. A well-kneaded dough should feel slightly tacky but not gluey.
What's the best way to store homemade bread?
Cool the bread completely, then wrap it tightly in plastic wrap or place it in an airtight container. Store at room temperature for up to 3 days, or freeze slices for 1-2 months. To reheat, wrap slices in foil and warm at 350°F for 5-10 minutes. For extra freshness, freeze the whole loaf and thaw overnight in the fridge.
Can I make this bread without a Dutch oven?
Place the shaped loaf on a parchment-lined baking sheet and bake at 375°F for 5-10 minutes before transferring to a preheated broiler for 2-3 minutes to crisp the crust. For extra steam, add a metal tray filled with boiling water to the oven's lower rack. The crust won't be as crackly, but the interior will still be light and fluffy.