
Desserts
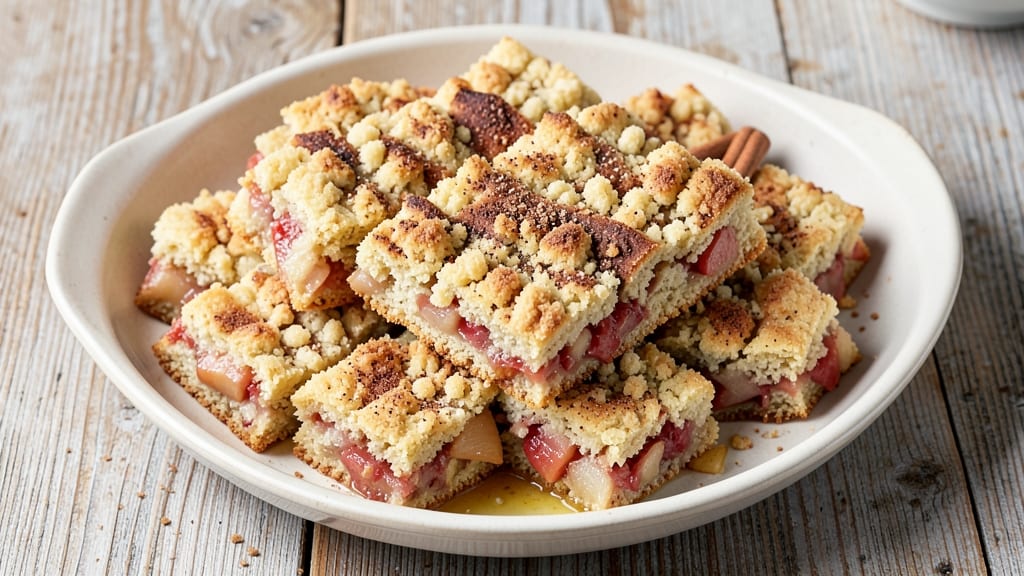
This apple crisp shortbread bars recipe combines the cozy warmth of caramelized apples with the buttery crunch of shortbread—perfect for satisfying dessert cravings without the fuss. The secret lies in layering a tender shortbread base, a spiced apple filling that softens just enough to create pockets of fruit, and a golden oat topping that adds irresistible texture. I developed this recipe after years of baking crisp bars, refining each element to ensure every bite delivers that perfect balance of sweet, spiced apple and buttery shortbread.
The shortbread base starts with cold butter and flour, chilled until firm for that signature crumbly yet tender texture. Meanwhile, the apple filling simmers with cinnamon, brown sugar, and lemon juice until the fruit breaks down into a thick, fragrant compote—just sweet enough to caramelize without overpowering.
The oat topping, with its blend of brown sugar and melted butter, crisps beautifully while maintaining a chewy center, creating a contrast that makes these bars impossible to resist.
Once baked, the bars develop a golden crust with a soft, warm interior, where the shortbread layers stay distinct yet cohesive. The aroma of cinnamon and caramelized apples fills the kitchen, signaling that dessert time has arrived.
These bars are ideal for potlucks, holiday gatherings, or a simple treat to enjoy with a cup of coffee or a glass of milk—no one will guess how easy they are to make.
Cut into perfect squares, they’re easy to serve and portion, making them a crowd-pleaser. The recipe scales effortlessly, so you can double or triple it for larger gatherings.
The key to success is patience—chilling the dough, letting the filling thicken, and baking until the edges are golden but the centers remain tender. With just a few simple steps, you’ll have a dessert that tastes like a hug in every bite.
Ingredients for apple crisp shortbread bars
Six apples, three sugars, and one egg—this shortbread bar recipe turns simple ingredients into dessert magic.
| Ingredient | Amount | Notes |
|---|---|---|
| Unsalted Butter 🧈 | 1 ½ cups | Cold, cubed for shortbread |
| All-Purpose Flour 🌾 | 2 ½ cups | Sifted, spooned lightly |
| Granulated Sugar 🍚 | ½ cup | For shortbread base |
| Large Egg 🥚 | 1 whole | Room temperature |
| Medium Apples 🍎 | 6 whole | Peeled, cored, sliced |
| Brown Sugar 🍚 | 1 ½ cups | Packed, for filling |
| Ground Cinnamon 🌿 | 2 tbsp | Plus extra for topping |
| Lemon Juice 🍋 | 2 tbsp | Freshly squeezed |
| Old-Fashioned Rolled Oats 🥣 | 2 cups | Not quick oats |
| Light Brown Sugar 🍚 | ½ cup | For oat topping |
| Ground Flour Blend 🌾 | ½ cup | For oat topping |
| Salt 🧂 | ½ tsp | Fine sea salt |
| Vanilla Extract 🌸 | 1 tsp | Pure vanilla |
The butter is non-negotiable here—European-style unsalted like Plugrá or Kerrygold gives the best flavor. Grab it from the deli section, not the baking aisle. For apples, Honeycrisp or Granny Smith hold up perfectly—they caramelize beautifully without getting mushy. If you're using pre-sliced apples from the salad bar, pat them dry first or the filling will be watery. The flour? King Arthur or Gold Medal are my go-tos, but any all-purpose will work. Pro tip: Chill your butter-flour mixture for at least 30 minutes—this makes all the difference for that perfect shortbread texture.
No vanilla extract? Vanilla bean paste works great, or even a scratch-made vanilla sugar if you're feeling fancy. Short on oats? Toasted pecans or chopped walnuts add a nice crunch to the topping. The cinnamon can be swapped for pumpkin pie spice if you're feeling seasonal. For the apples, if you can't find Honeycrisp, Fuji or Gala are solid backups. And if you're worried about the bars being too sweet, reduce the brown sugar by 2 tbsp—trust me, they'll still be delicious. The lemon juice is key for brightening the apples, so don't skip it unless you're using tart apples like Granny Smith.
These bars keep beautifully—5 days at room temperature wrapped in parchment, or 2 weeks in the fridge. For freezing, slice them first, then freeze on a tray before bagging. Reheat at 350°F for 5-7 minutes to restore that fresh-from-the-oven crunch. I always make a double batch because they disappear fast—perfect for holiday gifts too. Store the dry ingredients (flour, oats, sugars) in airtight containers, and the butter in the fridge until ready to use. The shortbread dough can be prepped a day ahead—just bake when ready.
Why You'll Love This Recipe
- No-Fuss Assembly: I swear by this recipe because it’s basically mix-and-bake. You’ll cream butter and sugar together, fold in flour and egg—no rolling, no fuss—then just dump the spiced apple filling on top. Even my kid could handle it (and she’s still convinced butter is “yellow poison”).
- Buttery Crunch Magic: That shortbread crust? It’s the star. The cold butter cuts into flaky layers, and when it bakes, it turns into a golden, shatteringly crisp shell that holds up to the warm, spiced apples underneath. Honestly, the contrast is what makes it—simple ingredients, but the texture? Chef’s kiss.
- Snack-to-Dessert Swiss Army: I make these for breakfast bars, after-school snacks, or even a quick dessert when company drops by. The apples stay fresh for days, and the shortbread crust keeps them from getting soggy. Pro tip: Sprinkle with cinnamon sugar before baking—suddenly, they’re fancy enough for a potluck.
- Zero-Waste Leftovers: Between us, these bars last forever. I’ll bake a pan on Sunday, and by Wednesday, I’m still grabbing one from the fridge. The apples soften just enough to be comforting, while the crust stays crispy—no sad, mushy edges here. Plus, they’re cheap to make (just apples, butter, and flour) and way better than store-bought treats.
Step-by-step instructions for apple crisp shortbread bars
Here's how to create the perfect balance of buttery shortbread and caramelized apple filling.
Prepare the Shortbread Base
Preheat your oven to 350°F. In a large mixing bowl, combine the 1.5 cups unsalted butter (cold and cubed) with the 0.5 cup granulated sugar. Use a pastry cutter or your fingers to work the butter into the sugar until it resembles coarse crumbs with pea-sized butter pieces remaining.
Add the 2.5 cups all-purpose flour, 0.5 tsp salt, and 1 tsp vanilla extract. Mix gently until just combined—don't overwork the dough. Press two-thirds of the mixture evenly into an 8x8-inch baking dish, creating a thin, even layer. Chill in the refrigerator for 15 minutes while you prepare the filling.
Create the Caramelized Apple Filling
In a large bowl, combine the 6 peeled, cored, and sliced medium apples with the 1.5 cups packed brown sugar, 2 tbsp ground cinnamon, 2 tbsp lemon juice, and the remaining one-third of the shortbread mixture. Toss gently to coat the apples evenly in the sugar mixture.
Spread this apple mixture evenly over the chilled shortbread base in the baking dish. The apples should be packed tightly but not overlapping. Sprinkle the top with an additional 1 tbsp ground cinnamon for extra warmth.
Assemble the Crisp Topping
In a medium bowl, mix together the 2 cups old-fashioned rolled oats, 0.5 cup light brown sugar, and 0.5 cup ground flour blend. The oats should look evenly coated with sugar. Sprinkle this mixture evenly over the apple filling, pressing down gently to help it adhere.
Here's where it gets exciting—press down firmly with your fingers or the back of a spoon to create a textured, golden-brown topping. The oats should be packed tightly but not overly compressed. This creates that perfect crunchy texture we all love.
Bake to Golden Perfection
Bake in the preheated 350°F oven for 40-45 minutes, or until the top is golden brown and the filling is bubbling at the edges. The center should still have a slight jiggle when the dish is gently shaken.
Let the bars cool in the pan for 15 minutes before transferring to a wire rack to cool completely. This resting period allows the shortbread to set properly and prevents crumbling when you slice. Once fully cooled, cut into 16 bars using a sharp knife or pizza cutter.
Serve Warm or Store Properly
For the best experience, serve these bars warm straight from the oven. The contrast between the warm, caramelized apples and the cool, buttery shortbread is pure magic. If storing, keep in an airtight container at room temperature for up to 5 days or freeze for up to 3 months.
Real talk: These bars are even better the next day when the flavors have had time to meld. The shortbread softens slightly, creating the perfect texture contrast with the crisp topping and tender apples. Enjoy with a scoop of vanilla ice cream for the ultimate dessert experience!
Pro Tips For Making Apple Crisp Shortbread Bars
- CHILL THE DOUGH: I learned this the hard way—rolling out cold shortbread dough straight from the fridge makes it easier to handle and prevents it from spreading too much in the pan. Let the dough rest for 30 minutes in the fridge before shaping, even if you’re eager to bake.
- PEEL AND GRATE APPLES: Skip slicing—peeling and grating apples (with skin) gives you even cooking and that perfect crisp texture in the bars. A box grater works fast, and you’ll avoid soggy spots from uneven apple pieces.
- BAKE UNTIL GOLDEN: Don’t pull them out at the first sign of browning. Shortbread crisps best when baked until the edges are deep golden (about 18-20 minutes at 350°F). Underbaked bars stay pale and crumbly.
- USE A MIXER FOR BUTTER: Cream the butter and sugar until light and fluffy—this isn’t the time to be lazy with a fork. A stand mixer (or strong hand mixer) cuts down on effort and guarantees a tender, not greasy, shortbread layer.
Common mistakes when making perfect results
Overmixing the Shortbread
I’ve learned the hard way that overworking the shortbread dough is a fast track to tough, dense bars. Once you’ve mixed in the flour, stop as soon as the dough comes together—it should look shaggy, not smooth. Overmixing develops gluten, which turns your buttery shortbread into a chewy cookie.
Work the dough just until the butter is evenly distributed, then press it gently into the pan. Trust me, the shortbread will hold together even if it looks a little uneven. 🧈
Skipping the Chill
If you rush and skip chilling the shortbread base for 15 minutes, you’ll end up with spread bars instead of neat squares. The cold butter needs time to firm up so it holds its shape during baking.
I’ve seen home bakers skip this step, and their bars turn into a sad, melted puddle. Preheat your oven, then chill the dough while it’s waiting—it’s worth the extra time.
Uneven Apple Distribution
Packing the apples too tightly or leaving gaps creates uneven baking. The filling should be snug but not forced—think of it like a puzzle where every slice fits perfectly. If you’re using softer apples like Fuji, they’ll break down more and need slightly less packing.
For firmer apples like Granny Smith, press them gently but firmly to create a uniform layer. Uneven filling means uneven texture, and no one wants a bar with a dry side and a soupy center. 🍎
Overbaking the Topping
The oat topping should be golden brown, not burnt. Once it hits 40-45 minutes, start checking at the 40-minute mark. If you let it bake until the edges are dark brown, the topping turns bitter and the apples underneath get mushy.
Pull it out when the edges are golden and the center still has a slight wobble—it’ll set as it cools. A toothpick inserted should come out with a few moist crumbs, not wet filling.
Cutting Too Soon
Cutting the bars before they’ve cooled completely is a recipe for crumbly disappointment. The shortbread needs 15 minutes in the pan followed by full cooling on a rack. If you slice too early, the layers will separate, and you’ll end up with a messy pile of shortbread and apple filling.
Patience here pays off—wait until the bars are completely cool to the touch before cutting into perfect squares. 🔪
Ignoring the Lemon Juice
Lemon juice isn’t just for flavor—it prevents the apples from turning brown and keeps the filling bright. Without it, your bars will have a dull, oxidized look and taste flatter. Freshly squeezed lemon juice works best, but if you’re in a pinch, a splash of bottled lemon juice will do.
Don’t skip it, even if the recipe seems to be going fine without it—you’ll notice the difference in the final texture and taste. 🍋
Nutrition facts
Frequently asked questions
Can I make these bars gluten-free?
Yes, but with some adjustments! Replace the all-purpose flour with a 1:1 gluten-free baking flour blend (like Bob's Red Mill) and use certified gluten-free oats. The shortbread texture will be slightly different but still delicious. For the best results, add 1 tsp xanthan gum to the flour blend to improve binding.
How do I prevent the shortbread from turning crumbly?
The key is proper chilling and gentle handling. Always chill the shortbread base for at least 15 minutes before baking, and avoid overworking the dough. If your bars still crumble, try pressing the shortbread layer slightly thicker or using a tiny bit more butter (up to 1.75 cups) for extra tenderness.
Can I use canned apples instead of fresh?
Fresh apples give the best texture, but you can use canned apples in a pinch! Drain them thoroughly and pat completely dry with paper towels to remove excess moisture. For extra flavor, add 1 tsp apple pie spice to the filling. Avoid pie filling apples—they're too sweet and watery.
Why did my topping turn out too crunchy?
This usually happens when the topping bakes too long or the butter in the oat mixture melts completely. For a softer topping, reduce baking time by 2-3 minutes and press the oats more gently. If you prefer extra crunch, add 1 tbsp chopped nuts to the topping mixture before baking.
How should I store leftovers?
Store in an airtight container at room temperature for up to 5 days or freeze for 3 months. For best texture, reheat frozen bars at 350°F for 5-7 minutes until the topping crisps up again. The shortbread stays fresh longer when protected from air and moisture.