
Side Dishes
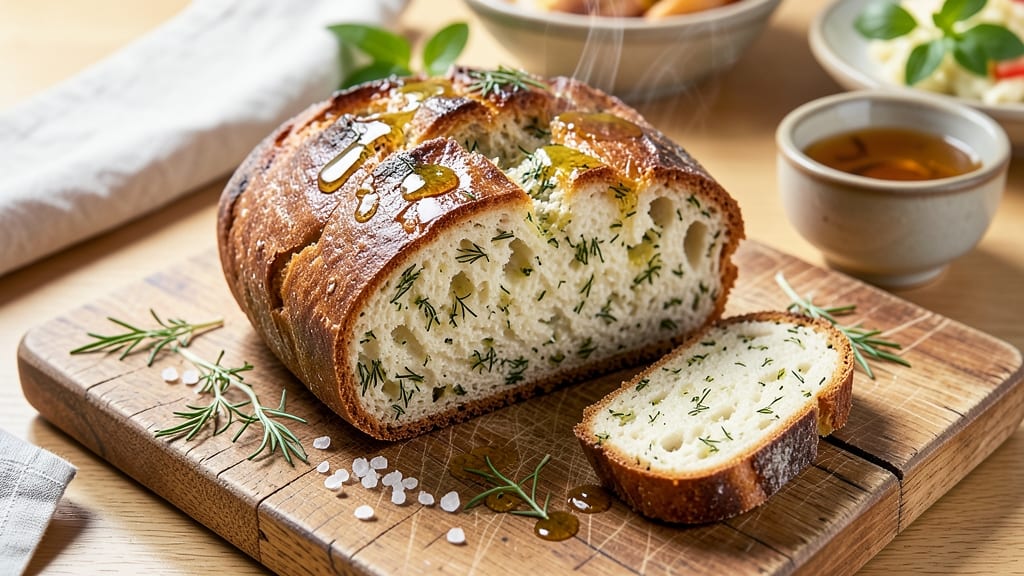
This artisan dill bread recipe delivers a fragrant, golden crust with a pillowy crumb that's infused with fresh dill's bright, herby notes. The secret lies in proper yeast activation and a slow fermentation process that develops deep flavor while maintaining that signature tender texture.
I've baked this version countless times for dinner tables, and it never fails to impress—even picky eaters ask for seconds.
What sets this bread apart is the combination of traditional techniques and simple ingredients. You'll work with active dry yeast, warm water, and a touch of honey to activate it properly, followed by a 30-minute knead that develops the gluten for that perfect chewy-yet-tender crumb.
The dill is folded in during the final shaping, ensuring its aroma infuses every bite without overpowering the bread's natural flavor.
By the time it emerges from the oven, you'll have a loaf with a crispy, golden crust that crackles when broken open, revealing a soft, airy interior speckled with tiny dill flecks.
The aroma alone will have everyone gathering around the table, and the first bite delivers that perfect balance of herby freshness and comforting bread warmth. This is the kind of bread that elevates any meal from ordinary to extraordinary.
While this recipe calls for a Dutch oven for that professional bakery-style crust, I'll show you how to achieve excellent results with a standard baking sheet as well. The key is patience—letting the dough proof properly and baking it just until the internal temperature reaches 190°F.
Serve warm with butter, or toast slices for breakfast the next morning. Here's how to make it from start to finish.
Ingredients for artisan dill bread
Simple ingredients that transform into a fragrant, golden loaf with perfect herby crumb.
| Ingredient | Amount | Notes |
|---|---|---|
| Active Dry Yeast 🍞 | 2 ¼ tsp | One packet or 7 grams |
| Warm Water 💧 | 1 cup | 110-115°F for yeast activation |
| Granulated Sugar 🍚 | 1 tbsp | For yeast activation |
| Honey 🍯 | 1 tbsp | For yeast feeding |
| All-Purpose Flour 🌾 | 4 cups | Plus 2 tbsp for dusting |
| Kosher Salt 🧂 | 1 ½ tsp | Diamond Crystal preferred |
| Fresh Dill 🌿 | ½ cup | Finely chopped leaves only |
| Unsalted Butter 🧈 | ¼ cup | Cold, cubed for dough |
| Large Egg 🥚 | 1 whole | Room temperature |
| Milk 🥛 | ¼ cup | Warm for dough tenderness |
| Cornmeal 🌽 | ½ cup | For Dutch oven prep |
The yeast is your foundation—King Arthur or Bob's Red Mill brands activate most reliably. If your kitchen isn't warm enough, microwave the water for 20 seconds to hit that 110-115°F sweet spot. Fresh dill is non-negotiable here; store-bought bundles work best if you chop the stems separately. For the butter, Plugrá or Land O'Lakes are my go-tos—just make sure it's cold when you cube it. The milk should be warm but not hot enough to cook the egg when mixed in later.
No fresh dill? Dried dill at one-third the amount works, but the flavor won't be as bright. Short on butter? Olive oil at the same quantity keeps the dough tender. The honey can be swapped for maple syrup if you prefer. For a gluten-free version, use a 1:1 flour blend like Bob's Red Mill's, but expect a denser crumb. If your yeast is old, test it first by mixing with warm water and sugar—it should foam in 5-10 minutes.
Store the dough in an airtight container for up to 24 hours in the fridge if you need to slow fermentation. The finished loaf keeps at room temperature for 3 days wrapped in a clean towel, or freeze slices for 3 months. For reheating, wrap slices in foil and warm in a 350°F oven for 5 minutes. The crust stays crispy when stored properly—just avoid plastic bags, which make it soggy.
Why You'll Love This Recipe
- No-Knead Magic: I swear by this—just mix the yeast, warm water, and honey, let it sit while you do dishes, then fold in the flour and dill. The dough practically rises itself, and honestly? That’s my kind of baking.
- Dill’s Bright Kiss: That fresh dill—chopped fine and folded into the dough—gives every bite a herbaceous punch. The honey adds just enough sweetness to balance the tang, and the crust? Crisp enough to hold a soup spoon without falling apart.
- Weeknight Workhorse: Slice it for sandwiches, toast it for breakfast, or serve it warm with butter. Between us, I’ve used leftover slices to top salads, mop up marinara, and even as a quick crouton for soup. It’s the one loaf that does it all.
- Budget-Friendly Staple: Five ingredients, one bowl, zero fuss. The yeast and flour stretch to feed a family, and the honey and sugar cost pennies compared to store-bought loaves. Plus, it keeps for days—so you’re not scrambling to use it up.
Step-by-step instructions for artisan dill bread
Here's the method for crafting bread with a fragrant dill-infused crust and an airy interior.
👨🍳 Step 1: Activate the Yeast and Prepare the Dough Base
In a large mixing bowl, combine the 1 cup warm water, 1 tablespoon granulated sugar, and 1 tablespoon honey. Sprinkle the 2.25 teaspoons active dry yeast over the liquid and let it sit for 5-10 minutes until it becomes frothy. This step ensures your yeast is alive and ready to work.
Once the yeast is bubbling actively, add the 0.5 cup finely chopped fresh dill and mix well. The dill will infuse the dough with its bright, herbal aroma. In a separate bowl, whisk together the 1 whole large egg and 0.25 cup warm milk until fully combined. This egg-milk mixture will add richness and tenderness to your bread.
👨🍳 Step 2: Combine Wet Ingredients and Mix the Dough
To the yeast mixture, add the egg-milk mixture, 0.25 cup cold cubed unsalted butter, and 1.5 teaspoons kosher salt. Mix these ingredients until the butter begins to incorporate. Gradually add the 4 cups all-purpose flour, mixing just until the dough comes together and is no longer sticky.
Transfer the dough to a lightly floured surface and knead for 8-10 minutes until smooth and elastic. The dough should spring back slowly when poked. If it feels too sticky, add 1 tablespoon flour at a time until it reaches the right consistency. Avoid over-kneading, which can make the bread tough.
⏰ Step 3: First Rise and Shape the Dough
Lightly oil a large bowl, place the dough inside, and cover it with a damp kitchen towel. Let it rise in a warm place for 1-1.5 hours or until it has doubled in size. You'll know it's ready when the dough feels light and airy, and gentle finger presses leave a slight indentation that slowly fills back in.
Once risen, punch down the dough to release any air bubbles. Transfer it to a floured surface and divide it into four equal pieces. Shape each piece into a round loaf, tucking the edges under as you go. Place the shaped loaves on a baking sheet lined with parchment paper, spacing them about 2 inches apart. Cover them again and let them rise for another 30-45 minutes until puffy.
🔥 Step 4: Bake in the Dutch Oven for Crispy Crust
Preheat your oven to 450°F with a Dutch oven inside for 30 minutes. Remove the Dutch oven and carefully place the loaves inside, spacing them evenly. Sprinkle the top of each loaf with a little extra flour and 0.5 cup cornmeal for a crispy crust. Bake for 20-25 minutes until the bread is golden brown and sounds hollow when tapped on the bottom.
For an even deeper flavor, brush the tops of the loaves with melted butter immediately after removing them from the oven. Let the bread cool on a wire rack for at least 1 hour before slicing. This resting period allows the crumb to set and the flavors to fully develop, ensuring each slice is perfectly pillowy with a fragrant dill-infused crust.
Pro Tips For Making Artisan Dill Bread
- Test Yeast First: DESCRIPTION: Skip straight to mixing and you might end up with a brick. Sprinkle that active dry yeast into warm water with a pinch of sugar—if it’s not foaming like a beer head in 5-10 minutes, toss it and grab fresh. I learned this the hard way after baking a dense, flavorless loaf because my yeast was past its prime.
- Honey Before Kneading: DESCRIPTION: Mix the honey into the warm water before activating the yeast—this helps dissolve it fully and feeds the yeast more efficiently. I used to add it later, and the bread always tasted slightly uneven, like some parts got more sweetness than others. Sounds weird, but it works.
- Don’t Over-Knead: DESCRIPTION: This dough isn’t as forgiving as pizza dough. Once it’s smooth and just slightly tacky (about 8-10 minutes by hand), stop. Over-kneading develops too much gluten, and your dill bread will turn out chewy instead of tender. I know, I know—it’s tempting to keep going, but resist the urge.
- Steam the Pan: DESCRIPTION: Before baking, pour a cup of hot water into a baking sheet and place it on the lower rack. The steam guarantees a crackly crust and prevents the top from drying out. I skipped this once, and the bread came out flat and sad—like it had given up halfway through. (Your future self will thank you.)
Troubleshooting this dish
Dough Too Sticky?
If your dough feels too sticky during kneading, don’t panic—it’s normal with this recipe’s high moisture content. I recommend adding 1 tablespoon flour at a time while kneading until the dough reaches a smooth, slightly tacky but manageable consistency.
Overworking it can make the bread tough, so aim for 8-10 minutes total of kneading. 💪
Dense or Gummy Crumb?
A dense or gummy crumb usually means the dough didn’t develop enough gluten or was underproofed. Make sure you knead for the full 8-10 minutes and let the dough rise until it’s doubled in size—both times.
Also, avoid overmixing after adding flour, as this can disrupt gluten formation. For extra tenderness, brush the baked loaves with melted butter after cooling.
Flat or Underbaked Loaves?
If your loaves turn out flat or underbaked, check your oven temperature—it should be 450°F when you place the dough in. Use an oven thermometer to confirm accuracy. Another common issue is insufficient proofing; let the dough rise until it’s puffy and springs back slowly when poked.
For extra rise, try placing your proofing bowl in a warm oven with the light on for 10 minutes before baking.
Dill Flavor Too Weak?
Fresh dill is key here—if your bread lacks dill flavor, chop 0.25 cup extra dill and fold it into the dough after the first rise. For a stronger infusion, try steeping the dill in warm water for 5 minutes before using it in the dough.
Avoid dried dill, as it can taste bitter and won’t provide the same bright aroma. 🌿
Crust Too Pale?
A pale crust often means the bread didn’t bake long enough or the oven wasn’t hot enough. Increase baking time by 5 minutes and ensure your Dutch oven is preheated for 30 minutes before adding the dough.
For extra color, brush the loaves with a little water or egg wash before baking. A 450°F oven should give you a golden crust in 20-25 minutes.
Dough Didn’t Rise?
If your dough fails to rise, your yeast may be dead or the water wasn’t warm enough. Test your yeast by mixing 1 tsp yeast, 2 tbsp warm water, and 1 tsp sugar—it should foam in 5-10 minutes.
Use water between 110-115°F for activation, and place the dough in a warm spot (like a turned-off oven with the light on) for proofing. Patience is key—don’t rush the process! ⏰
Nutrition facts
Frequently asked questions
Can I substitute dried dill for fresh in this recipe?
Use 1/3 cup dried dill instead of 0.5 cup fresh, but expect a milder flavor. For best results, finely chop the dried dill and steep it in warm water for 5 minutes before adding to the dough. Fresh dill gives the brightest, most aromatic flavor that really shines in artisan bread.
How do I store homemade artisan dill bread?
Wrap the cooled loaves in a clean kitchen towel and store at room temperature for up to 3 days. For longer storage, freeze slices in a sealed bag for 3 months. To reheat, wrap slices in foil and warm in a 350°F oven for 5 minutes. Avoid plastic bags—they make the crust soggy!
Why does my dill bread taste bland?
Bland flavor usually means the dill wasn't properly incorporated or the yeast didn't activate fully. Try steeping the chopped dill in warm water for 5 minutes before adding to the dough, and always test your yeast first by mixing with warm water and sugar—it should foam in 5-10 minutes. Also ensure your oven reaches 450°F for proper baking.
Can I make this bread without a Dutch oven?
Yes! Line a baking sheet with parchment paper and bake at 425°F for 25-30 minutes, covering with foil for the first 15 minutes to prevent over-browning. For extra crust crispness, sprinkle with cornmeal before baking. The texture will be slightly different but still delicious.
How do I know when the bread is fully proofed?
The dough is ready when it's doubled in size and leaves a slight indentation when gently pressed with your finger that slowly fills back in. For visual confirmation, look for bubbles forming on the surface. In warm conditions (75°F), this takes about 1-1.5 hours. If your kitchen is cooler, give it extra time—up to 2 hours.