
Side Dishes
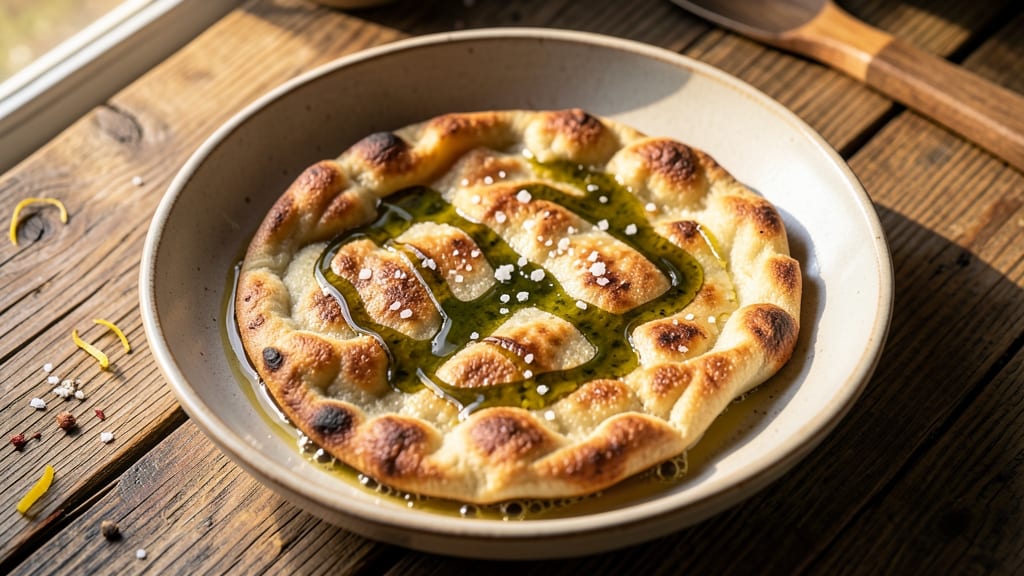
This artisan flatbread recipe delivers the perfect balance of crispy edges and chewy centers, transforming simple ingredients into a restaurant-quality side.
The secret lies in hand-stretching the dough and baking it in a hot skillet, creating a texture that's crisp on the outside yet tender inside—ideal for dipping, stuffing, or serving alongside any meal.
We start with a basic dough of flour, yeast, water, and salt, then incorporate olive oil for richness and herbs for aroma. The shaping technique is crucial: gently stretching the dough by hand ensures an even thickness and those coveted crispy edges.
Whether you're baking in a home oven, cast-iron skillet, or even a wood-fired grill, the result is consistently delicious.
What sets this recipe apart is the focus on texture—achieving that perfect contrast between the crispy exterior and the soft, airy interior. The dough's elasticity and the high-heat baking method ensure every bite delivers the right balance.
Pair it with hummus, baba ganoush, or your favorite spread for an elevated dining experience.
This versatile flatbread works as a side, wrap, or even a base for flatbread pizzas. The recipe includes tips for adapting it to sourdough, whole wheat, or gluten-free variations, so you can customize it to your preferences. Let’s get started on creating your own artisan masterpiece.
Ingredients for artisan flat bread
Nine simple ingredients transform into restaurant-quality flatbread with crispy edges and chewy centers.
| Ingredient | Amount | Notes |
|---|---|---|
| All-Purpose Flour 🌾 | 3 cups | Plus 1 tbsp for dusting |
| Active Dry Yeast 🍞 | ¼ tsp | Or 1 packet instant yeast |
| Granulated Sugar 🍚 | ¼ tsp | Activates the yeast |
| Fine Sea Salt 🧂 | 1 tsp | Diamond Crystal preferred |
| Extra-Virgin Olive Oil 🫒 | ½ cup | Plus extra for brushing |
| Warm Water 💧 | 1 cup | 105-110°F for yeast activation |
| Fresh Rosemary 🌿 | 1 tbsp | Finely chopped, or dried |
| Fresh Thyme 🌿 | 1 tbsp | Leaves only, finely chopped |
| Garlic Cloves 🧄 | 2 cloves | Minced for dough infusion |
The flour is the foundation—King Arthur or Caputo bread flour gives the best texture, but all-purpose works in a pinch. Yeast can be tricky, so check the expiration date—fresh is key. I grab mine from Whole Foods or the bulk section at Trader Joe's. For the olive oil, California avocado or Italian extra-virgin brands add the most flavor. Rosemary and thyme? Fresh is ideal, but dried works at half the amount if you're in a hurry. The garlic cloves should be fresh—no pre-minced jars here.
No rosemary? Fresh oregano or basil works just as well. Dried yeast? Make sure it's active dry—not the quick-rise kind. The olive oil can be swapped for avocado or grapeseed oil, though olive gives the best flavor. Short on time? Pre-minced garlic from a tube (like Trader Joe's) saves steps. The sugar is optional but helps activate the yeast faster—skip it if you're using a sourdough starter instead. For a nutty flavor, swap half the flour for whole wheat or spelt.
Store the dough in an airtight container with a damp towel for up to 24 hours in the fridge. Freshly made flatbread reheats best in a 350°F oven for 3-5 minutes to restore crispiness. Freeze shaped flatbreads for up to 3 months—just thaw at room temp before baking. I like to make a double batch and freeze extras for lazy weeknights.
Why You'll Love This Recipe
- No-Knead Magic: I swear by this dough—just mix, let it rise, and roll. No standing at the counter, no overworked arms, just a simple flour-yeast-oil combo that does all the heavy lifting for you.
- Crispy-Creamy Contrast: That first bite? The outside crackles like a campfire, while the inside stays pillowy soft. The olive oil and salt make it taste like it belongs in a bakery, not my kitchen.
- Weeknight Wonder: Slap some hummus on it for dinner, fold it into a sandwich for lunch, or serve it warm with soup. It’s the one dough that works for breakfast, brunch, or a lazy Sunday spread.
- Budget-Friendly Staple: A single batch feeds my family for days—leftover slices reheat perfectly, and the ingredients cost pennies. Plus, no fancy tools needed; just a bowl and your hands.
Step-by-step instructions for artisan flatbread with crispy edges
Here's how to craft flatbread with perfect texture—crispy edges and chewy centers every time.
Activate the Yeast for Maximum Rise
In a small bowl, combine the 1 cup warm water (between 105-110°F—test by dropping a pinch of sugar in; if it bubbles, it's perfect), 0.25 tsp granulated sugar, and 0.25 tsp active dry yeast. Stir gently and let sit for 5-10 minutes until frothy. You'll see bubbles forming—this confirms the yeast is alive and ready to work. If nothing happens after 10 minutes, your yeast is dead and you'll need to start over.
While waiting, finely chop the 1 tbsp fresh rosemary and 1 tbsp fresh thyme leaves, then mince the 2 cloves garlic into a paste using a knife or garlic press. These aromatics will infuse the dough with deep, herby flavor that pairs perfectly with the crispy texture. Keep them handy—they'll be added next.
Mix and Knead the Dough
In a large mixing bowl, combine the 3 cups all-purpose flour and 1 tsp fine sea salt. Make a well in the center and pour in the yeast mixture, 0.5 cup extra-virgin olive oil, and the minced garlic, rosemary, and thyme. Using a wooden spoon or your hands, stir until a shaggy dough forms. The dough will be sticky—this is normal.
Turn the dough onto a lightly floured surface and knead for 8-10 minutes until smooth and elastic. You're looking for a dough that springs back when poked and feels slightly tacky but not wet. If it's too sticky, add 1 tbsp flour at a time until it's manageable. Shape the dough into a ball, place it back in the bowl, cover with a damp towel, and let rise in a warm place for 1-2 hours or until doubled in size. The dough should feel light and airy when pressed gently.
Divide and Rest the Dough
Once the dough has risen, punch it down to release air, then divide it into 4 equal pieces (about 8 ounces each). Roll each piece into a smooth ball and let them rest, covered, for 15 minutes. This resting period relaxes the gluten, making the dough easier to stretch and preventing it from shrinking back when you shape it later. If you skip this step, your flatbread might end up tough or unevenly thick.
While the dough rests, preheat your oven to 475°F with a pizza stone or baking sheet inside. The stone will give you the best crispy edges, but a baking sheet works in a pinch. Line a plate with a clean kitchen towel and lightly dust it with flour—this is where you'll stretch your flatbread before baking. The towel prevents sticking, and the flour keeps the dough from drying out.
Stretch and Shape the Flatbread
Working with one ball of dough at a time, dip your fingers in flour and gently press down on the center of the dough to flatten it slightly. Grab one edge and pull it toward you while pushing the opposite edge away—this creates tension and helps the dough stretch evenly. Rotate the dough as you work, pulling and stretching until it forms a 10-inch round about ¼-inch thick. The edges should be slightly thinner than the center, which is where the chewy texture develops.
If the dough resists or tears, let it rest for another 5 minutes and try again. Overworking it will make it tough, but don't rush—this is where the magic happens. Transfer the stretched flatbread to the floured towel and let it rest for 10 minutes while you shape the remaining dough. This final rest ensures the gluten relaxes, giving you that perfect balance of crispy and chewy.
Bake for Crispy Perfection
Carefully slide the flatbread onto the preheated pizza stone or baking sheet. Brush the top lightly with extra-virgin olive oil and sprinkle with a pinch of fine sea salt. Bake for 8-10 minutes until the edges are deep golden brown and the center is still slightly soft to the touch. The flatbread should puff up slightly in the middle—this indicates it's cooked through but still chewy.
Remove the flatbread from the oven and let it cool for 2 minutes before serving. The contrast between the crispy, golden edges and the soft, pillowy center is what makes this flatbread so special. Serve warm with your favorite dips, soups, or as a side to grilled meats. If you're making multiple batches, keep the oven at 475°F and bake one at a time—they'll crisp up beautifully even when reheated briefly in the oven.
Pro Tips For Making Artisan Flat Bread
- Measure Yeast by Weight: That tiny packet of yeast is not 21 grams—it’s usually 7 grams. Weigh it out instead of eyeballing it, or your dough might rise like a sad deflated balloon. I learned this the hard way when my first batch took three hours to puff up.
- Dissolve Sugar in Warm Water: Mix the granulated sugar with the warm water first before adding yeast—this guarantees the yeast wakes up faster. Cold water + sugar = sluggish fermentation, and nobody wants to wait all day for their flatbread to rise.
- Stretch, Don’t Roll: Skip the rolling pin—gently stretch the dough by hand to even out thickness. Rolling pin creates tight gluten strands that make the bread tougher. Works best if you’ve let the dough rest 10 minutes after shaping.
- Preheat Cast Iron: Get that cast iron screaming hot—450°F (230°C) minimum—before adding the bread. Cold pans = soggy centers, and nobody wants a flatbread that’s basically a pancake. Test with water droplets: if they sizzle violently, you’re ready.
Pro cooking tips for perfect results
Dough Temperature Control
Your dough's temperature makes all the difference for that perfect crispy-chewy texture. Keep the water for mixing between 70-75°F—too hot and the yeast activates too quickly, too cold and it won't rise properly.
I use a thermometer (like the Thermoworks Thermapen) to check, but the classic sugar test works too. The dough itself should feel slightly warm to the touch (78-80°F) after kneading—this ensures proper gluten development without overworking it. 🌡️
Hand-Stretching Secrets
The key to those signature crispy edges lies in how you stretch the dough. Start by dimpling the center with your thumb, then grab opposite edges and pull outward while rotating the dough. Think of it like making a perfect circle snowball—gentle pressure and rotation prevent tears.
I find using semolina flour (instead of all-purpose) on my hands and surface gives just the right grip without sticking. Work quickly but patiently—rushing causes uneven thickness and tough spots.
High-Heat Baking Hacks
Your oven's heat matters more than you think. Preheat for at least 45 minutes with a pizza stone inside to reach 500°F+. For even better results, place the stone on the lowest oven rack—this creates intense heat from below.
If you don't have a stone, use a cast-iron skillet on the middle rack. The moment the dough hits the hot surface, you'll see instant browning—this is when the Maillard reaction kicks in for that perfect crisp. 🔥
Steam for Extra Crisp
Here's a pro move: Add a steaming tray to your oven's lower rack while preheating. When you bake, the steam helps create that perfect oven spring while keeping the center tender. I use a baking steel (like Pizzacraft) for restaurant-quality results at home.
For a quick hack, spray the oven walls with water before baking—just be careful not to overdo it or your flatbread will turn gummy.
Resting Stages Matter
Never skip the 15-minute rest after dividing the dough—this crucial step relaxes the gluten so it stretches properly. I cover my dough balls with a damp kitchen towel in a proofing box (or just a warm oven with the light on).
For the final 10-minute rest before baking, I place the stretched flatbread on a floured towel. This prevents the dough from shrinking back and ensures that perfect ¼-inch thickness throughout. Patience here pays off with professional-looking results every time.
Nutrition facts
Frequently asked questions
Can I make this flatbread without yeast?
Yes! For a quick version, replace the yeast with 1 tbsp baking powder and reduce the water by 2 tbsp. Skip the rising time and bake immediately at 425°F for 6-8 minutes. The texture will be more like a focaccia than traditional flatbread, but still delicious.
Why did my flatbread turn out tough instead of chewy?
Over-kneading or skipping the resting stages usually causes this. The dough should be kneaded just until smooth (8-10 minutes) and never overworked. Always let the dough rest after dividing (15 minutes) and before stretching (10 minutes). If the dough feels tight when stretching, it needs more rest time.
What's the best way to reheat leftover flatbread?
For maximum crispiness, place flatbread on a baking sheet and reheat at 375°F for 3-5 minutes. If you prefer a skillet method, heat a dry pan over medium-high heat for 30 seconds per side. Avoid microwaving—it makes the bread soggy. The key is high heat for just enough time to restore the crispy edges.
Can I add cheese or other toppings?
For a cheesy version, sprinkle ½ cup shredded mozzarella or feta on the dough before baking. For extra flavor, add sun-dried tomatoes, spinach, or roasted garlic to the dough while mixing. Just be mindful of baking times—cheese may require 1-2 extra minutes to melt properly.
How do I make this gluten-free?
Replace the all-purpose flour with a 1:1 gluten-free baking flour blend (like Bob's Red Mill) and add ½ tsp xanthan gum if your blend doesn't include it. You may need 1-2 extra tablespoons of water since gluten-free doughs absorb differently. Let the dough rest longer (20-30 minutes) as it's more fragile when stretching.