
Side Dishes
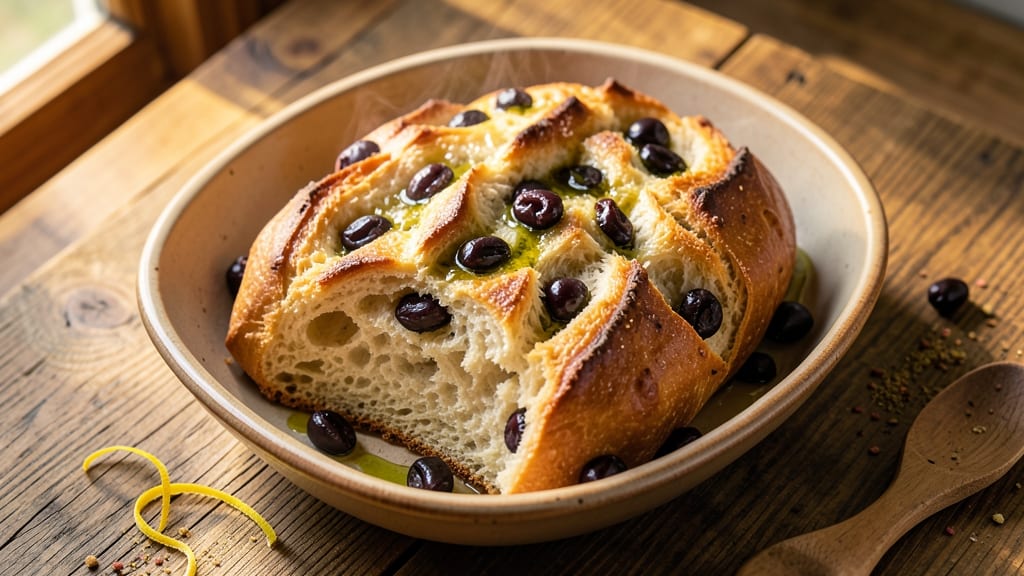
This artisan olive bread recipe transforms your kitchen into a Mediterranean bakery with just 5 simple ingredients and 24 hours of patience. The secret lies in a slow fermentation that develops deep flavor, while swirls of briny olives and fresh herbs create a texture that's both rustic and refined.
I perfected this recipe after years of baking—each slice delivers that perfect balance of crispy crust, airy crumb, and herby olive bursts.
The beauty of this bread is in its simplicity: no fancy equipment, no complicated techniques. A simple dough of flour, water, yeast, and olive oil gets its character from the slow rise and the olive swirls folded in before baking.
The result? A loaf with a golden, crackling crust that gives way to a tender interior studded with salty, briny olive pockets. This is the kind of bread that makes you want to bake it every weekend.
What makes this recipe truly special is how it elevates any meal—serve it warm with olive oil and balsamic, or enjoy it toasted the next day. The olives add a salty contrast that cuts through rich dishes, while the crusty exterior makes it perfect for dipping.
Once you try this, store-bought bread will never measure up again. Let's get started on creating your perfect loaf.
For the best results, let the dough ferment overnight in the refrigerator—this slow rise is what builds the deep, complex flavor. If you're short on time, a 4-hour room-temperature rise still yields excellent results.
The key to that perfect crust? A hot oven and steam—don't skip this step. With just a little time and attention, you'll have bread that tastes like it came straight from a Tuscan bakery.
Ingredients for artisan olive bread
Five simple ingredients transform your kitchen into a Tuscan bakery with just 24 hours of patience.
| Ingredient | Amount | Notes |
|---|---|---|
| All-Purpose Flour 🌾 | 4 cups | Plus 2 tbsp for dusting |
| Extra-Virgin Olive Oil 🫒 | ½ cup | High quality, fruity flavor |
| Active Dry Yeast 🍞 | ¼ oz | Or 2 1/4 tsp (7g) |
| Warm Water 💧 | 1 ¼ cups | 105-110°F for activation |
| Salt 🧂 | 1 ½ tsp | Diamond Crystal preferred |
| Pitted Kalamata Olives 🫒 | 1 cup | Chopped, briny variety |
| Fresh Rosemary 🌿 | 2 tbsp | Finely chopped, stems removed |
| Fresh Thyme Leaves 🍃 | 1 tbsp | Or 1 tsp dried thyme |
| Coarse Sea Salt 🧂 | 1 tbsp | For crust sprinkle |
The flour is the foundation—King Arthur or Caputo Tipo 00 if you want to splurge, but all-purpose works beautifully. The olive oil should be extra-virgin with fruity notes—none of that cheap cooking oil. I grab mine from Whole Foods or Trader Joe's where they have good quality. For the yeast, Fleischmann's is reliable, but if you're in Italy, grab Lallemand—it's a game-changer. The olives need to be briny, not sweet—Kalamata olives from the Mediterranean section at Costco or Gelson's are my go-to. Fresh herbs make all the difference, so snag them from the market if possible—rosemary and thyme should smell vibrant, not wilted.
No extra-virgin olive oil? Light olive oil works in a pinch, but you'll lose that fruity depth. Can't find Kalamata olives? Green olives or even capers add brininess, though the texture will differ. Short on rosemary? Oregano or basil at double the amount gives a similar Mediterranean vibe. The yeast measurement is tricky—if your package says 2 1/4 tsp equals 1 oz, use that. For the water, warm it to body temperature—too hot kills the yeast, too cold and it won't activate. The dough will be sticky, but that's normal—don't add extra flour or you'll ruin the crust. If you're in a rush, instant yeast works at half the amount with no proofing time.
This dough is a beast—it needs 24 hours in the fridge for maximum flavor, but 4 hours at room temp works in a pinch. Store the dough in a sealed container with a damp towel to keep it from drying out. The olives and herbs can be prepped ahead and stored in the fridge for 3 days. Once baked, the bread keeps at room temperature for 2 days, but it's best served fresh. Wrap it in a clean kitchen towel to maintain moisture. Freeze slices for up to 3 months—just toast straight from frozen for that perfect crust.
Why You'll Love This Recipe
- Five-Ingredient Magic: I swear by this—just flour, olive oil, yeast, water, and salt. That’s it. No fancy mixers or last-minute grocery runs. The olive oil does all the heavy lifting, giving it that rich, buttery depth without extra work.
- Crust That Cracks: Between us, there’s nothing like that golden, shatteringly crisp crust with a soft, pillowy center. The olive oil keeps it moist, but the salt and yeast team up for that perfect snap. (Yes, even on a Tuesday night.)
- Pan-Friendly Flex: This bread thrives in a cast-iron skillet or on a baking sheet—no special tools needed. I’ve made it for brunch, as a side for dinner, or even toasted for lunch. It’s the ultimate blank canvas for any meal.
- Leftovers That Last: A single batch keeps for days in the fridge, and it reheats like a dream. Slice it fresh, toast it, or freeze half for lazy mornings. Honestly, I’ve never met a loaf that’s lasted less than a week in my house.
Step-by-step instructions for artisan olive bread
Here's how to craft a rustic loaf with a crispy crust and fragrant olive-herb swirls—every bite delivers that Mediterranean magic.
Activate the Yeast for Maximum Rise
In a small bowl, combine the 1.25 cups warm water (between 105-110°F) with the 1.5 teaspoons salt and 0.25 ounce active dry yeast. Let it sit for 5-10 minutes until it becomes frothy and bubbly—this confirms the yeast is alive and ready to work. If it doesn't bubble, your yeast may be dead, and you'll need to start over.
I like to use a digital thermometer to check the water temperature—too hot and you'll kill the yeast; too cool and it won't activate properly. The frothy texture signals that the yeast has transformed the sugars into carbon dioxide, which will later create those airy pockets in your bread.
Mix the Dough Until Smooth and Elastic
In a large mixing bowl, combine the 4 cups all-purpose flour and the 0.5 cup extra-virgin olive oil. Make a well in the center and pour in the yeast mixture. Using a wooden spoon or dough whisk, stir until everything comes together, then turn it out onto a lightly floured surface.
Knead the dough for 8-10 minutes until it becomes smooth and elastic. You'll know it's ready when it springs back slowly when poked and doesn't stick to your fingers. This step develops gluten, which gives the bread its structure and chewiness. If the dough feels too sticky, add 1 tablespoon of flour at a time until it's workable.
Create the Olive-Herb Swirl and First Rise
While the dough rests, finely chop the 1 cup pitted Kalamata olives and mix them with the 2 tablespoons fresh rosemary and 1 tablespoon fresh thyme leaves. Roll the dough into a 16x12-inch rectangle on a floured surface, then spread the olive-herb mixture evenly over the surface, leaving a 1-inch border around the edges.
Roll the dough tightly into a log, tucking in the sides as you go. Place it seam-side down in a lightly oiled bowl, cover with a damp towel, and let it rise in a warm place for 1-2 hours until it has nearly doubled in size. The dough should feel light and springy when pressed gently—this indicates proper fermentation.
Shape and Proof for Maximum Flavor
Punch down the risen dough to release air, then shape it into a 12-inch round loaf on a parchment-lined baking sheet. Make a 1-inch deep well in the center and let it proof for another 30-45 minutes until it rises about 1 inch above the sides. This second rise ensures a light, airy crumb.
While the dough proofs, preheat your oven to 425°F with a Dutch oven inside for 30 minutes. The hot Dutch oven creates steam, which is crucial for that perfect crust. Brush the top of the dough with a little extra-virgin olive oil and sprinkle generously with the 1 tablespoon coarse sea salt—this will give it that signature crusty texture.
Bake to Golden Perfection
Carefully transfer the dough (with parchment) into the preheated Dutch oven. Bake, covered, for 25 minutes, then remove the lid and bake for another 15-20 minutes until the bread is deep golden brown and sounds hollow when tapped on the bottom. The internal temperature should reach 190-200°F.
Let the bread cool on a wire rack for at least 30 minutes before slicing—this allows the crumb to set and prevents a gummy texture. The aroma alone will make your kitchen smell like a Mediterranean bakery. Slice into thick pieces to reveal those beautiful olive-herb swirls throughout!
Pro Tips For Making Artisan Olive Bread
- Measure Flour by Weight: Dump that cup into the bowl and hope for the best? Nope. Olive oil bread is fussy about flour—weigh it instead. A standard cup of all-purpose flour can vary by 10-15 grams, and that tiny difference throws off your dough’s hydration. Use a kitchen scale for 350 grams (or 3 cups plus a handful) and skip the guessing game.
- Bloom Yeast in Oil: I used to dissolve yeast in water like a robot, but here’s what actually works: mix the yeast with warm olive oil (about 100°F) first, then add water. The oil coats the yeast cells, making them activate faster and survive longer. Your dough will rise smoother, and you’ll avoid that sad, flat loaf when yeast gets sluggish.
- Skip the Over-Kneading: This dough isn’t tough like sourdough—overwork it, and you’ll end up with a dense brick. Knead just until the flour pulls away from the sides (about 5-7 minutes by hand). The olive oil makes the dough sticky and weak; trust your eyes, not your arms. Stop when it’s just together, not when it’s "perfect."
- Steam the First 10 Minutes: That crispy crust? It’s not magic—it’s steam. Before baking, pour a quarter-cup of water into a tray on the oven rack and spray the dough with water. The combo of residual steam and the olive oil’s natural moisture creates a shatteringly thin crust. No Dutch oven? This trick still works.
Common mistakes when making great artisan olive bread
Over-Kneading the Dough
Resist the urge to knead longer than 10 minutes—over-kneading develops too much gluten, which makes the bread dense instead of light and airy. I’ve ruined many loaves by kneading until my arms ached, only to end up with a brick-like texture.
Stop when the dough springs back slowly when poked and doesn’t stick to your fingers. If it feels too sticky, add flour 1 tablespoon at a time, but don’t overdo it—too much flour dries out the dough and weakens the crust. 🌾
Skipping the Olive Prep
Chopping olives into uniform, small pieces ensures even distribution throughout the loaf. If you leave them whole or chop them too large, they’ll create uneven pockets and might not bake evenly. I once used whole olives, and they stayed undercooked in the center while the crust burned.
For best results, finely chop them with kitchen shears or a food processor—aim for pea-sized bits that blend seamlessly into the dough.
Ignoring the Proofing Time
Rushing the 1-2 hour proof (or the 30-45 minute final proof) is a surefire way to end up with a dense, flat loaf. The dough needs time to ferment and develop flavor and structure.
I’ve learned this the hard way—once, I baked it after just 30 minutes because I was impatient, and the result was sad and compact. Trust the process: the dough should nearly double in size and feel light and springy when pressed gently.
If your kitchen is cold, place the bowl near a warm oven (with the light on) to speed up fermentation.
No Steam During Baking
Steam is the secret weapon for that golden, crackling crust. Without it, your bread will bake flat and pale. I used to skip this step until I realized how much difference it makes.
Here’s how to do it right: Preheat your oven with a Dutch oven inside for 30 minutes—the steam trapped inside creates the perfect environment.
If you don’t have a Dutch oven, place a baking sheet on the lower rack and pour 1 cup hot water into it just before baking. The steam will rise and work its magic on the crust.
Cutting Too Soon
Slicing bread immediately after baking is a cardinal sin—it ruins the texture. The bread needs at least 30 minutes to cool and set properly. I’ve made this mistake too many times, ending up with gummy, uneven slices.
Patience pays off: let the bread cool on a wire rack, and you’ll be rewarded with clean slices that reveal those beautiful olive-herb swirls. If you’re in a hurry, slice it after 1 hour, but the first 30 minutes are critical for the crumb to firm up.
Using Low-Quality Olive Oil
The quality of your olive oil makes a huge difference in flavor and texture. Cheap or refined olive oil lacks the fruity depth that enhances the bread’s character. I used to grab whatever was on sale, but after tasting the difference with extra-virgin olive oil, I never went back.
Look for bottles labeled “fruity” or “peppery” at stores like Whole Foods or Trader Joe’s. A little goes a long way—don’t skimp on this ingredient, as it’s what gives your bread that authentic Mediterranean taste. 🫒
Nutrition facts
Frequently asked questions
Can I make this bread without a Dutch oven?
Yes! If you don't have a Dutch oven, preheat your oven to 425°F and place a baking sheet on the lower rack. Just before baking, pour 1 cup hot water into the sheet to create steam. Cover the loaf with a metal bowl or aluminum foil for the first 25 minutes to mimic the steam effect. The crust won't be quite as crackly, but you'll still get great results.
How do I store leftover artisan olive bread?
Wrap the cooled loaf in a clean kitchen towel or place it in an airtight container to keep it fresh for 2-3 days at room temperature. For longer storage, freeze individual slices wrapped in plastic wrap for up to 3 months. To revive frozen bread, toast straight from the freezer for 3-5 minutes until crispy.
What if my dough doesn't rise properly?
If your dough isn't bubbly after 1-2 hours, check your yeast first—it may be expired. Try activating fresh yeast in warm water with a pinch of sugar to test. If the yeast is fine, place your dough bowl in a warmer spot (like near your turned-on oven) to speed up fermentation. Cold kitchens slow yeast activity, so never rush this step—proper rise is key to flavor and texture.
Can I substitute other herbs for rosemary and thyme?
For a similar Mediterranean flavor, try 1 tbsp dried oregano or 1 tbsp fresh basil instead of rosemary. If you prefer a different profile, parsley and marjoram work well too. Just maintain the same total herb amount (3 tbsp total) to keep the balance. The herbs should complement the olives' brininess without overpowering it.
Why does my crust come out pale instead of golden?
A pale crust usually means insufficient steam during baking. Always preheat your oven with the Dutch oven inside for 30 minutes before baking. Brush the dough with extra-virgin olive oil and sprinkle with coarse sea salt before baking for better browning. If using the water tray method, ensure the water is boiling hot when you add it. The crust needs that high heat and steam to develop properly.